

FSDL contains powerful features for integrating text into Frogans sites.
About FSDL fonts
One of the first things to know about writing text in FSDL is that you use only the fonts that are included in Frogans Player. This ensures that every piece of text authored in a Frogans site will be displayed exactly the same for every user, regardless of their user device, operating system or locality.
This is different from how text is displayed on Web, where your operating system fonts are typically used. On the Web, if a preferred font is not available, a substitute font is used. Consequentially, you’re never really sure how text characters will show a Web page (if at all!), or even how the text going to line up with the graphics. And even if you have the “right” font, you can’t be sure how it’s going to be treated from one operating system to another.
But as a Frogans site author, you can be 100% sure that your site visitors will see your text exactly as you do.
As of the alpha version 0.6.1, Frogans Player for Developers includes 51 individual fonts from 14 font families. This selection of fonts can accommodate texts written in the vast majority of the world’s languages. Frogans Player renders these fonts in the exact same manner, whatever the user device.
For a list of the FSDL Fonts (referred to as “physical fonts”), see the most recent release of the FSDL technical specification.
The FSDL text production chain
As I’ve written before, the FSDL authoring process works like a production chain. The same applies to authoring text in FSDL.
-
You start with the <setfont> element, where you specify a physical font to be used, its size, color and other attributes;
-
You then create a text resource by writing your text using the <restext> element where you can use different “fonts” for different styles in the same block of text;
-
Present your text resource on the Frogans slide in a <layer> element (as an intermediate step, you might use the <resmerge> for combining your text resource with other resources).
Step-by-step: the <setfont> element
The <setfont> element has one attribute, “fontid,” and contains one or more <font> child elements.
Imagine that you wanted your text to automatically change typestyle depending on the script (e.g., Latin, Cyrillic, Chinese) of a given character? The <setfont> element lets you do that.
Each <font> child element has attributes for specifying the typeface, size, color, etc., but also the specifying specific character scripts for which that <font> element applies. So, for different scripts you can define different <font> elements as children of your <setfont> element.
So for instance, if you write a piece of text containing Latin characters, but also some Chinese characters, you can define <setfont> so that the typestyle changes to best accommodate the the different scripts. Let’s illustrate this:
<setfont fontid=”LatinChinese“>
<font [typestyle attributes for when the text uses Latin characters] />
<font [typestyle attributes for when the text uses Chinese characters] />
</setfont>
For example:
<setfont fontid="LatinChinese">

<font scripts="default" pfont="122-6-sans-r" height="12.0" xitalic="50" color="#0000FF" spacing="5"/>
<font scripts="Han:Chinese_Simplified" pfont="118-1-serif-r" height="12.0" underline="on" color="#FF0000"/>

</setfont>
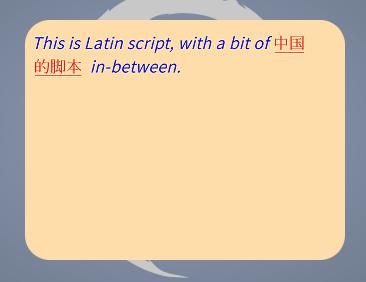
When you write a text using “LatinChinese,” the characters will be shown in different typestyles, depending on if they are Latin or Chinese, like:
Here are some example attributes for the <font> child element.
-
“scripts” – By indicating one or more specific script here, you are telling Frogans Player to render your text according to the other attributes in this <font> element. If you set the value here to “default,” then these attributes will apply to all scripts other than those specified in a different <font> element. See Appendix 1 of the FSDL 3.0 Recap for a list of script values.
-
“pfont” is the physical font from the FSDL fonts that will be used. These fonts have reference names like “118-1-serif-r,” but each one corresponds to a specific free font that has a real name (“118-1-serif-r” is actually HanaMinA, Regular, a serif font with good support for Chinese and Japanese characters). See Appendix 2 of the FSDL 3.0 Recap.
-
“spacing” – Here you can increase or decrease the spacing between characters.
-
“xbold” and “xitalic” – Use these attributes to make your text bolder or italic.
-
“height,” “stretching,” “underline,” “strikeout,” “opacity” and “color” are all pretty self-explanatory.
Step-by-step: the <restext> element
The <restext> element creates a resource of text content. It must contain one or more <text> child elements. The actual text is written between the beginning and end tags of <text> child elements.
The <restext> parent element contains a “fontref” attribute whose value is the same as that of the “fontid” for a <setfont> element. Other attributes are for formatting the text, for example:
-
“size” – The dimensions of the text block, which are also the dimensions of the resource created;
-
“orientation,” like ‘h-ttb-ltr’, meaning “horizontal, top-to-bottom, left-to-right” or ‘v-rtl-btt’ for “vertical, right-left, bottom-to-top”;
-
“talign” – The ‘begin’ value makes the text flush-left, ‘end’ flush right. ‘Center’ and ‘justify’…
-
“resid” is the identifier of the created resource, you need this identifier when you create a <layer> that uses this resource;
-
“fontref” – again, the value of this is the same as the “fontid” in a <setfont> element; this allows you to apply the typestyle defined in <setfont>.
Like I said above, the actual text is written between the beginning and end tags of the <text> child element. But you can also use it to override any attributes defined in the <restext> parent element. For example, if you want one part in a block of text to be italic while the rest of the block is bold, you can put that part in a separate <text> element.
For example:
<restext resid='tex1_r' size='600,440' fontref='LatinChinese' orientation='h-ttb-ltr'>
<text>This is Latin script, with a bit of 中国的脚本 in-between. That is</text>
<text fontref='NormalFont' join='space'>so incredibly</text>
<text join='space'>cool!</text>
<text></text>
<text fontref='NormalFont'>This is probably worth a post or two on frogans-lab.com.</text>
</restext>
…which gives you this on a Frogans slide:
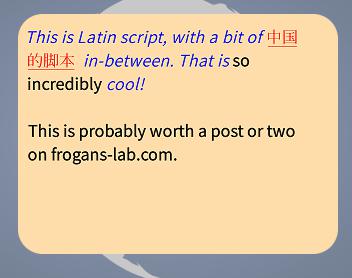
Notice in the above example how a <text> element creates a new line, except where the “join” attribute is used. By default, each new <text> element starts a new line, unless the value of the “join” element is either ‘space’ or ‘nospace.’
Conclusion
Click here to download the Frogans slide used in this example.
You can also view it online, if your Frogans Player for Developers alpha is version 0.5.x or later. To do this, create a <test-frogans-site> element in your “configuration-for-testing.xml” file and include the following information:
…
<domain-name>frogans-lab.com</domain-name>
…
<directory>/frogal/textut</directory>
…
<home-slide-file>/textut.fsdl</home-slide-file>
…
You can also view the FSDL document in your Web browser at http://frogans-lab.com/frogal/textut/textut.fsdl
For a full overview of the elements and attributes discussed here, be sure to check out the FSDL 3.0 Recap.
Leave a Reply